
When Jen brought forward the idea of decorating Ukrainian eggs this past weekend, I jumped at the opportunity.
I don’t know if it’s just me and my friends, it seems as though many people have had exposure to Ukrainian egg painting at some point in their lives. For me, it was in either grade two or three, when I was living in Sudbury the first time around. My mom and I made a set of three eggs on a mother-daughter craft date. The details of the actual painting aren’t too clear in my mind, but I do know the legacy of those eggs live on. Up until this past week, the eggs were sitting in the display cabinet in my parent’s dining room. Because you don’t empty the contents of the egg prior to painting (the membrane serves as insulation, otherwise the empty shell would become too hot and delicate when you burn off the wax with a candle) they have to be rotated every few weeks until everything dries up inside. Two of the eggs my mom and I painted a decade-and-a-half ago are still going through this drying process, and she has recently taken them out of the cabinet in hopes they’ll receive benefit from better air circulation on the kitchen window sill.

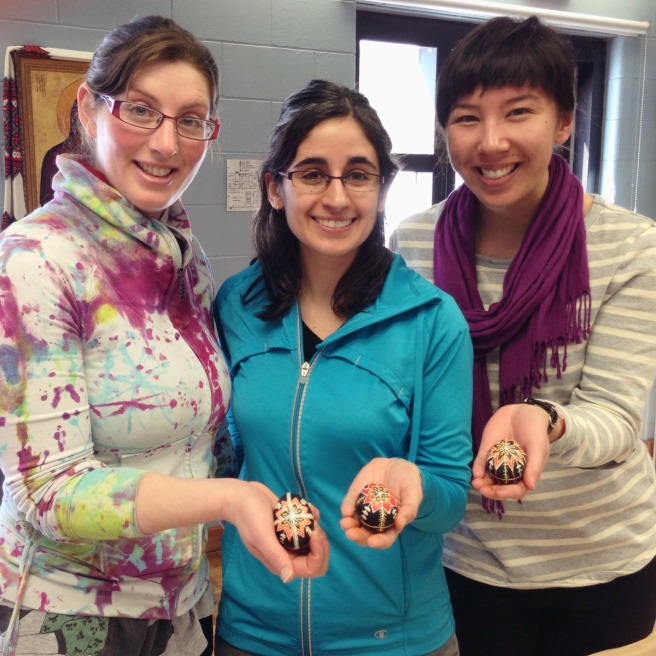
My egg painting outing this time around was with Jen, and our other friend and colleague, Martha. It was at the Ukrainian Seniors’ Centre in Sudbury. We entered the room where, over the next two hours, a set of medium eggs would be transformed into an intricate display of layered dyes.

Most of the people attending the workshop were presumably mothers on a Saturday morning outing with their kids. Jen, Martha, and I look as though we could be anywhere between the ages of 16 and 30, so the two older ladies running the workshop earmarked us as high school students, an assumption likely confirmed as we rebelliously displayed our “free-spirited” egg design techniques over the next two hours.

The purpose of the workshop was to create the traditional “pysanka” style of Ukrainian eggs. Traditionally, the labrynth-like design was used to trap evil spirits as they penetrated a household. The design relies on the use of symmetry and quadrants and involves the use of a “kystka,” a copper funnel tool you heat in order to melt beeswax, which is then drawn onto the surface of the egg. Using the kystka is a lot of fun, and I love watching the funnelled edge gobble up the freshly melted wax.

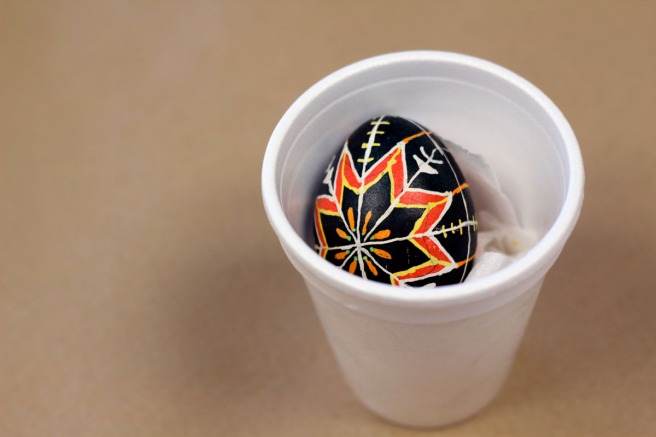
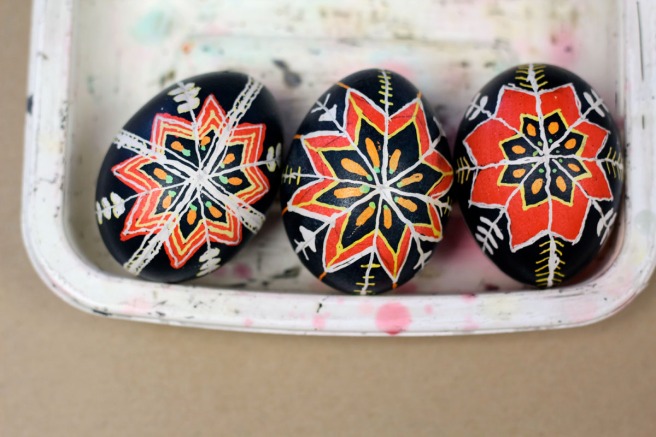
The steps of creating a pysanka were extensively detailed in an instruction book the three of us got when we started the workshop. As you can see from the final photos at the bottom of this post, I think our eggs all captured the gist of the traditional style. They do, however, have their own signature – something that makes each distinguishable from the next. This creativity, we discovered, was not in the spirit of what the ladies running the workshop wanted. They were very sweet and well-intentioned, however they did not want us to express any of our personality on the eggs. I understand – traditional Ukrainian motifs should be respected – but we were not treading so far off the path as to dishonour that tradition. We were simply adding wheat where there should have been pussy willows, and additional green dye where there should have been black. Because much of the religious significance is lost on my agnostic-self, I didn’t feel the need to conform with the Christian symbolism. This led to a bit of backseat egg decorating. I’ll leave it at that.


In the end, I think the two ladies running the workshop were relieved to see our eggs still resembled the traditional pysanka, and that we had some level of competence that was formally doubted. Of course, the workshop facilitators are very talented and experienced egg designers themselves, and created such beauties as these beaded designs:

The workshop was tonnes of fun and I learned a lot – not only about how to design more Ukrainian eggs in the future, but also about Ukrainian culture and tradition.
In terms of how to create the actual pysanka design, here’s how that worked: The egg is separated into different sections – split vertically à la Greenwich Meridian and horizontally à la equator. That centre point is then intersected diagonally across the egg to create a series of eight triangles in each quadrant on either side of the egg.
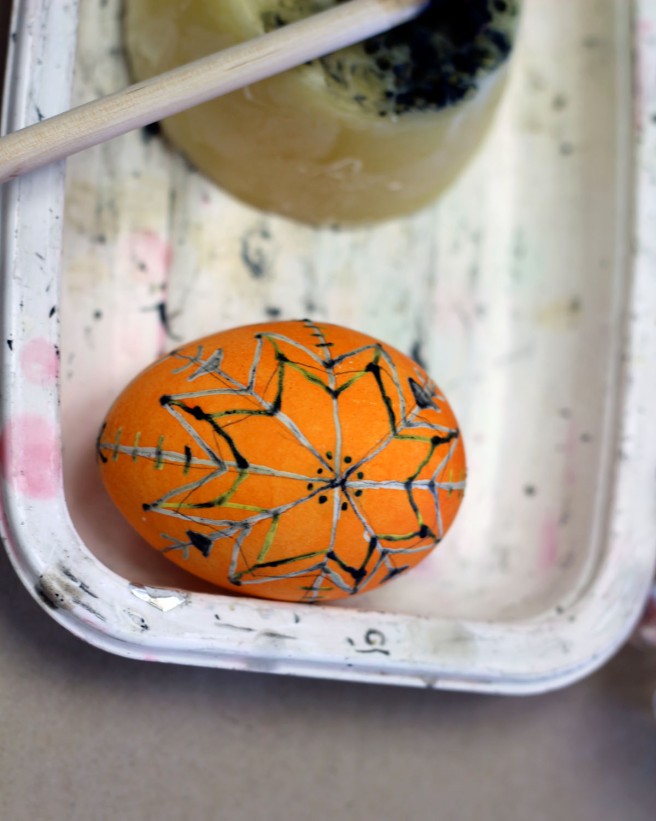
From there, an eight-pointed star is added on each side to represent the sun god (or Christ, following the advent of Christianity in Ukraine), and other flourishes are added as well. Dye-wise, you dip from lightest colour (yellow) to the darkest (black). The areas you cover in beeswax with the kystka will be immune to the next shade of dye, thereby allowing you to dip the egg in its entirety, while only colouring it in parts. At the end, you burn off the wax using the side of a candle flame, and gingerly wipe the glossy melted bits for the grand reveal. It’s all very exciting, and after two hours of covering the egg in wax and dye, it’s rewarding the see your handiwork transform into a beautiful pysanka.

Love! I did Ukranian eggs with my Ukranian grandma and aunts when I was a kid. I think we started with this exact design, to learn, and my parents still have some of ours in their china cabinet, too! Beautiful!
Wonderful! Everyone should have a chance to make them – such a fun and rewarding final product. Plus, it sounds like it was a great family bonding experience for you. Thanks for the comment :)
So beautiful!!
Thanks so much, Jenny!
Hello Hilary, These eggs are so colorful! Did you keep the final design in your mind when drawing on the egg in pencil so you had room for everything?
Hello – yes, definitely had to be conscious of the final design from the very start. Luckily the ladies facilitating the workshop had examples of what the finished egg was supposed to look like, which helped to divide the egg.
HIlary,
What a beautiful way for families to spend time together. Thank you for this awesome and colorful blog! http://www.segmation.com
I have never done this before but would be a classic way to spend quality time with kids.
Beautiful! I’ve enjoyed making Pysanki eggs with my children for several years now. We always use our own creativity to switch the designs up a bit, too. All your eggs look great.
Thanks! I can’t wait to get more creative with my designs next year!
Love this, each time i’ve tried the surface of the egg was too greasy to take the water-based dye. How did you get the dye to take? Tony
Hi Tony, thanks for your comment. The ladies running the workshop said you have to prepare your egg for the dye by washing it in a bath of 1 cup water and 1 cup white vinegar. Hopefully that helps!
That makes a lot of sense. Thanks, Tony
I watched a Show on tv how to make eggs like that. What a process nice work
Awesome.. this is beautiful..
So beautiful and cute! I don’t really have the artistic hand to do this but sure would love to try :) :)
My arm and hand shakes like crazy when I try to draw anything! If I can do it, you can too :) Regardless, the end result is beautiful and certainly unique!
mmmm! will try :D
Oh and congratulations on freshly pressed :)
Beautiful eggs! Looks like a fun project and a great way to learn about the culture.
Fun and beautiful! What a great art and tradition :)
-Jen
I love it, specially the colorful. Great.
I used to do this back when I was in high school. I miss making them. I still have them saved and use them as ornaments during the holidays. So glad to see people doing this.
Just curious- if you miss it, why not do it? I bet if you contacted most any art teacher at a school or other place they would welcome an opportunity to have a workshop….
look beautiful and I love it. Great job.
Fabulous!!! Keep posting :-)
Fascinating! I enjoyed learning about this. Thanks for the fun post.
Great Post. Definitely an interesting read. Thanks for sharing.
http://tshirtlegend.com/
Nice post, glad to see you enjoyed making them. As a Ukrainian-American I’ve been making psyanky since I was three. My first work resembled a Jackson Pollock painting — not at all traditional :) These days, my mom and I use a syringe and blow out the contents of the egg and then seal the holes with wax. That way you never have to worry about them drying or cracking years later and producing a terrible smell.
Creative story. I thoroughly enjoyed the read. http://Www.abonnaire.wordpress.com
Well, that’s creativity at its best. Really would love to learn this art. Thanks for sharing. :)
http://vacationrentals-home.com/
so vibrant and colourful. awesome.
I have always wanted to try this but it looks complicated enough that I really think you need some guidance first time round, so havent been game to try by myself. It looks like lots of fun and you get a pretty decorated egg out the other side!
Христос Воскрес!
They are beautiful. I did this one year and set them aside to dry out – but they burst and I lost them all. Apparently I did not store or turn them properly. Maybe some day I will try it again – or just admire yours.
These are beautiful and I enjoyed the story with it. Thanks for sharing!
Reblogged this on Line Press'er.
Beautiful eggs and lovely blog.
This is so rad!
So rad!!!!
So glad to have seen this. I just saw some Ukrainian eggs my friend had and we were wondering how it’s done. Congratulations on being Freshly Pressed.
That was a very cool story. Thanks!
Reblogged this on cleansamurai.
Ciao & Pace (peace be unto you) in Italian.
My Father Kassymr was Unkrainian, and my mother was Italian. We had so many of these beautiful egg creative designs.in every room of our home. I think everyone should have a go at making their own design. Could lead to a great money-making business – especially if someone decided to paint every nation of the world on a egg!!!
wow amazing! i love this
Fascinating post to read! I enjoyed reading the post and learning about this craft. I grew up coloring Easter eggs but never knew you could do such amazing things with eggs. Great pictures and detail! Thanks for sharing!
Great photos :)
Wow, those eggs are prety cool! I’ve seen those made on tv before but i’ve never had the opportunity to try it. Thanks for sharing :)
Beautiful!
Very nice!
Reblogged this on ramtorn.
Ukrainian Easter eggs are so much fun. I’ve done them once, a year ago. (I posted about it here: http://housewifedownunder.wordpress.com/2012/04/09/ukrainian-easter-eggs/ ) Yours turned out much nicer than mine. When I did it, I kept breaking my eggs and making too many squiggles in my lines and such. I think you need to have a really steady hand to make a nice one.
This is a good piece of art. You have to be really skilled in painting the eggs. I wonder if you are using boiled or raw eggs?
Thanks! We used raw eggs. You just need to flip them upside down every few weeks to dry out the inner yolky bits.
These are so beautiful! I love the colors and the intricacy of the designs. Thanks for the tutorial, too. I don’t know if I dare try them, but what’s the worst that could happen? A few broken eggs and permanent dye spilled all over whatever I’m wearing? Wouldn’t be the first time!